
My scanning and post-processing workflow
Published on 9 June 2017
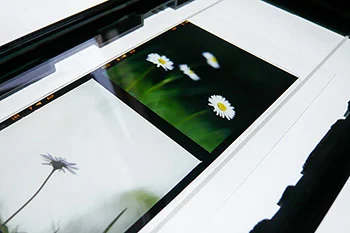
Slide mounted with a sheet of OH film and the Kami fluid
Introduction
My post-processing workflow has changed quite a bit since I adopted a 'hybrid' workflow 15 years ago. Then and for many years, I used a Coolscan V ED, which I still have and occasionally use, with the proprietary Nikon Scan software on a Windows machine. Since a few years I also shoot medium format, and now scan on a Nikon Coolscan 9000 using Vuescan. I shoot colour negative, slides and black and white films in each of the two formats.
Scanning
Film holders
The Coolscan 9000 is very easy to use so there is almost no need for this section, but just a few words on the film holders. The scanner comes with a range of film holders and various masks but I only use one of those supplied, the FH-835-S holder which takes two 35mm film strips (up to six frames per strip). For my medium format scanning, I use a third-party wet mount holder.
The FH835-S holder is loaded by pressing the two locks underneath the holder. This releases the grid that holds the film flat. This grid usually works very well. In practice I have only found it to struggle with very curly film, and particularly the kind that curls length-wise, such as Tri-X. To scan such film it is best to leave it for the necessary length of time under some heavy books to remove the worst curl. The holder has two cut-outs at frames 1 and 7 to simplify positioning the strips. These cut-outs make it easy to see the thin frame between the photos. The grid does feel quite filmsy, especially when one presses the locks, so it is important to be careful when opening the holder.
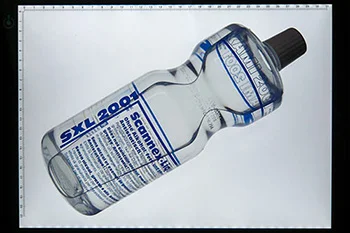
The wet mount tray, shown above, was made by Image Mechanics. It is no longer produced, though I'm fairly sure it could quite easily be 3D printed today. It is essentially a glass plate onto which one mounts film strips using a liquid and transparent film. I use the SXL-2001 fluid from Kami which is an antistatic liquid without alcohol, fat or oil. This liquid evaporates rather quickly (but not too fast) which means that there is no need to clean the film strips afterwards. To hold the film and liquid in place I use transparent 100µm polyester film, the kind used with overhead projectors. Online there are opinions that one should use Mylar, which is expensive, but I decided to ignore that and try OH-film and see no reason to use anything else. There are also views that one needs special wet mount tape (that sticks when wet) to tape down the edges. This is used for wet mounting on drum scanners, but that is not necessary on the flat glas bed of the Image Mechanics tray because the film is held firmly by the liquid between the glass and the polyester film. Incidentally, one needs only a small amount of liquid and there is no risk of the liquid dripping into the scanner.
Some probably think it is an overkill to wet mount, but for me there are two main advantages. First, it gives better scans. I believe sharpness is improved and the liquid definitely hides dust very effectively. Secondly, I never, ever, ever get Newton rings. I have the "anti-Newton glass" from Focal Point and also Nikon's rotating glass holder (FH-869GR) which also has such glass. I get Newton rings with both and it is a p.a.i.n. because it is not possible to foresee which type of image will likely have Newton rings and because they are in almost all circumstances nigh on impossible to remove in Photoshop. The little extra time taken during a scanning session to wet mount is considerably shorter than the time it takes to re-scan or edit images infested with Newton rings.
Vuescan
There seems to be quite a lot of criticism of Vuescan's interface, but to be honest I have never had a problem with it. I find it very logically laid out with tabs that go from 'input' to 'output' and with many specific settings which permit tweaking the scanning process in numerous ways. I prefer this freedom to set up my own workflow to being forced to adopt one designed by someone else. I am not trying to 'defend' Vuescan's creator Ed Hamrick, but it must be a challenge to write software that is meant to be interoperable with some 3000 scanners from several manufacturers. Seen against that background, Vuescan is remarkably easy to use. In fact, Nikon Scan which evidently is designed only for Nikon Scanners, does not strike me as being much more user-friendly.
I invested in the Professional version of Vuescan which costs 79 USD. The Standard edition costs 29 USD but 1) does not offer film/slide scanning, and 2) and this is important, only includes 1 year of free updates. The Professional version includes all features and unlimited updates. For that 79 USD is inexpensive in my world.
Anyway, now to the settings I use.
For colour negative films I have set up Vuescan to create "linear" TIFFs. This is necessary in order for me to use ColorPerfect (see below) to get rid of the film's orange mask. I do not use ColorPerfect with transparency film because I do not like the results, hence I have Vuescan set up to save non-linear TIFFs. The settings are similar for black and white film.
Slide settings
C41 settings
B&W settings
I have created several presets for the film types I use most often. Most presets exist for both 35mm and 120 film.
The Preview resolution (Input tab) varies depending on whether it is a 120 film preset or a 35mm film preset. For the former I use 667 dpi because it makes the preview take just a few seconds and the resolution is high enough for me to see the image clearly. For 35mm film I have 2000 dpi as preview resolution because it lets me scan scan the preview from the computer's memory when I press Scan. For 35mm film I always batch scan so once I press Scan the scanner will rattle through all twelve frames on its own and having the preview resolution at the scan resolution saves one pass over the first frame. This time saving is not possible with 120 film because I need to scan frame by frame since I often adjust the crop and set the autofocus point.
For both film formats I routinely use a Scan resolution (Input tab) of 2000 dpi because this is sufficient for web and monitor use of the photos and also for good quality prints at a smaller sizes. Only for specific purposes, such as large prints, will I scan at the maximum 4000 dpi. Also, a 2000 dpi scan is quite a lot faster than a 4000 dpi scan so all-in-all that scanning resolution is the sweet spot for my purposes.
For colour negative films I do not Lock exposure or film base color (Input tab). I know that is sometimes recommended to do so, but I have found that nothing is to be gained scan-quality-wise by doing so; there is only time to be lost because these functions add extra previews before scanning begins.
I have tested the Fine mode and Number of samples functions (which are scanner-specific, by the way, so not all scanners support them) but in most cases I do not see any tangible difference. However, for very dark scenes and night-sky or astrophotography they can help pull out more and reduce noise. These functions do add quite a bit of time to the scanning process though.
There is not much to be said about the Crop tab. In each preset Crop size is set to Maximum. After the preview of the first 35mm frame or after the preview of each medium format frame, I adjust the crop as required. For 35mm film I thereafter turn on Batch scan (Input tab) and press Scan. For 120 film I preview the next frame and set the crop as necessary.
On the Filter tab, Infrared cleaning, which is Vuescan's term for Digital ICE, is set to Light. I have read conflicting opinions online that the Heavy setting would be the better setting to use but I have not made comparisons. In any event, it seems to me that the Light setting deals with dust, scratches and the like really efficiently so I see no reason to change this.
The Color tab settings vary depending on the the film type. For colour negative and black and white films Color balance is always set to None. For colour negative films, this setting will only affect the preview because I scan linear TIFF, having ticked Raw file (Output tab). For black and white films, where the color balance setting will be saved to the (non-linear) TIFF, I am interested in retaining as much image information as possible, which I imagine the None setting does.
For slide film, the color balance is set to Neutral at the outset. For 35mm film I sometimes flip between Neutral, Auto levels and White balance on the first preview to see how the image looks. These are the most useful settings. Then I just pick what looks the best. I am well aware that each 35mm image may look slightly different, but that does not bother me because I always colour correct in post. Since I scan 120 film on a image-by-image basis, I will select the best of the three for each image.
White point (Color tab) is always set to 0 on slide films to retains maximum information in the highlights.
All my black and white presets use Kodak T-Max as a starting point under B/W vendor and B/W brand (Color tab). On the preview of the first frame of a 35mm film strip and for most 120 film frames I try the different B/W type settings, and sometimes also other black and white films. I usually aim for as 'flat' and contrast-less a preview as possible.
Every preset has the same Default folder for saving (Output tab) because that makes it quick and easy to select where the scans should end up. For each roll I create a 'processing subfolder'. It is in that folder I do all the post-processing. When I have completed the post-processing I move the TIFFs and JPEGs to their final locations elsewhere on my computer.
For black and white films I always and only scan as 16 bit Gray under TIFF file type. I am aware that some advocate using other settings, including 64 bit, to try to squeeze out the most image information possible from a monochrome frame, but I cannot see that the scans would be significantly (if at all) better. Plus other settings only result in larger file size.
Each preset has TIFF file name or RAW file name set to something like 'folder_1+'. The term 'folder' only serves to remind me to paste in the name of the processing folder into which I save the scans. I use this as the file name of my scans. Incidentally, on a Mac Vuescan permits click and drag to highlight this text and then to right-click the highlight to paste in the folder name (CMD-V does not work). Each image scan is auto-numbered (which is what the + sign does in Vuescan) using the processing folder as a file name.
The Printed size (Output tab) is set to 'Fixed dpi' and the Printed dpi to 360 dpi because I read somewhere that Epson printers, which is what I have, print best at 720 dpi and that 360 dpi is a suitable balance between print quality (being half of 720 dpi) and scan size. To be honest, I have not made comparisons in this respect.
In case it is easier to follow, here is the scanning workflow step-by-step.
General first steps
1. In Bridge I create a processing folder for the film and copy its name. The name follows this template: year-film number this year-(total number of films)-scanner-kamera-film type. Example 2017-81(585)-9K-TTL-VIA100, where 9K refers to the Coolscan 9000, TTL to the Leica M6TTL and VIA100 to Velvia 100. I have a number of such abbreviations which I use. There are clearly other, probably better and simpler ways of naming folders and files, but this works for me.
2. Launch Vuescan, select the appropriate preset, then:
- select the processing folder (Output tab, default folder), and
- replace 'folder' under TIFF file name or RAW file name by the processing folder's name.
Then for 35mm film
1. Load the film holder and insert into scanner.
2. Preview the first frame and set the crop. For slide film, try different settings for Color balance (Color tab). For black and white film, try different settings under B/W vendor and B/W type.
3. Set Batch scan to On (Input tab).
4. Press Scan. The first frame will be scanned from the preview.
5. When the twelfth frame has completed, repeat steps 1-4 with the next film strips.
Then for 120 film
This procedure is based on a document I very helpfully received from Darrell at Film Scan USA and which I posted in the Yahoo group for the Coolscan 8000/9000 scanners. Before I received this I encountered repeated hangs on the second frame of 120 films.
1. Wet mount the film:
- Cut an A4 sheet of transparent overhead film into three suitably wide strips.
- Clean the glas tray with a synthetic lens cloth and an antistatic brush. I use an old Decca antistatic carbon fiber record brush. Check with a loupe that there is no dust on the tray.
- Pour on Kami liquid on glass plate, place film, pour liquid onto film, place transparent overhead strip on top of film.
- Use lens cloth to press out bubbles. Verify against light using the loupe. As necessary brush the overhead film with the Decca brush.
- Adjust the film-overhead sandwich along the glass tray's lines.
6. Insert tray into scanner.
7. Press Preview.
8. Once the first part of the first frame is visible abort the preview if the film is not properly lined up. I like to have the black frames equally visible on each side of the frame. Eject tray and adjust the film-overhead sandwich. Then preview again to check alignment and, if good, let the preview complete.
9. Using the crop frame measure 1) the distance to the start of the first frame, and 2) the distance to the start of the second frame. Input these under Frame offset and Frame spacing, respectively (Input tab). Set Frame number (Input tab) to 3. This is necessary to prevent hangs.
10. Eject and re-insert tray. This also prevents hangs.
11. Preview the third frame and adjust the crop. For slide film, try different settings for Color balance (Color tab). For black and white film, try different settings under B/W vendor and B/W type.
12. Press Scan.
13. Repeat steps 11 and 12 for the second and first frames.
14. For the next film strip repeat steps 1-13. Note that I only make three strips of the transparent overhead film. I reuse the first overhead strip for the second film strip.
Post-processing
I post-process the scans while the scanner is busy, which means that I will typically have processed a roll shortly after the last frame has been scanned. The processing varies depending on the film type.
ColorPerfect
From Bridge I open the scans in Photoshop and run an action that I have recorded (which is very easy) which 1) sets sRGB as the colour space, and 2) launches ColorPerfect. My aim in ColorPerfect is only to get acceptable colour because I do the main colour correction in Adobe Camera Raw. The eagle-eyed reader will have noticed that in Vuescan Output color space (Color tab) is set to Adobe RGB, not sRGB. This is deliberate. Adobe RGB is a wider colour space than sRGB so I seek to capture as much colour information as possible. But sRGB is used on the web, which is the main use of my photos, so at some point I need to convert them to sRGB.
I sometimes (truth be told I usually forget) select the film in the bottom menus. One irritating 'feature' in ColorPerfect's interface is that it is not possible when one opens it to set a different film type from what was used last time without disabling the initial 'start panel' (the top-right-hand corner). This panel contains a button called Restore settings which permits cycling through several different colour balances. The settings are called As options-Optimized-Basic-Fresh start-Exact. Any interaction with ColorPerfect's interface will disable this useful function. One can press the << 'revert' button to reset the interface but one is still not able to set the film type without disabling the button. It is a minor gripe because in my workflow the main colour correction is done in Adobe Camera Raw.
So, what I do in ColorPerfect is basically only to cycle through to find the most natural-looking colour balance and then OK out from ColorPerfect. I do not click on any part of the image that looks "neutral gray" or use any other sliders or functions.
Photoshop
For colour negative films, once back in Photoshop I will quickly have a look at 100% to see if dust spotting is necessary. It is usually unnecessary for 35mm film, but for 120 film it is sometimes needed. This is true also for 120 format slide films, which I will always open, as a first post-processing step, in Photoshop for dust spotting. The wet mounting hides dust really well, but digital ICE will sometimes, particularly in brighter parts like sky, leave a residual mark which needs to be removed.
Having (as applicable) done rudimentary colour correction in ColorPerfect and dust spotting, I save the TIFF file. This becomes my "digital negative file" on which all further editing is based.
For black and white films, I will also first carry out dust spotting. This typically takes a bit of time because I always have dust on my scans. Particularly with 120 film this can be quite time-consuming. I used to run an action which sets a grayscale colour space and, in sequence, adds a Levels layer, then a Curves layer, and then flattens the image and finally saves the image. However, recently I have begun using Adobe Camera Raw also for black and white photos.
Adobe Camera Raw
It may seem odd to use Adobe Camera Raw as the main tool for post-processing scans, but I have found it to be the easiest and fastest way to edit. I do not follow any particular order, but the things I usually adjust are on the Basic panel (the one that looks like an aperture). For colour balance, I will try the Auto setting in the White balance drop-down menu. That normally will not look great but can be a starting point. With slides it is quite easy to compare with the slide on the light table (and it is remarkable how wrong the Auto setting usually looks with slides). Of the various adjustments I make, colour balance always takes the longest. It is quite tricky and not made easier by the fact that one's eyes (well certainly mine, at any rate) quickly get used to a particular setting and become oblivious to colour casts. It helps to look away from the image and then look back, and also to press the Preview checkbox to see the image without colour adjustments made (of course, if other edits have also been made they will equally be switched off and on like this, which is why I normally begin with the colour correction).
Regarding the other settings on the Basic panel, I normally try the Auto setting just to see what it looks like. Only rarely will the image look good. In fact, it almost always looks awful. It may be different on files that originate in digital cameras, but with scans (and in particular colour negative scans) Adobe Camera Raw usually causes an extreme lifting of exposure. Still, I find it good to see such an extreme alternative of the image because it helps me to better gauge just how bright an image I wish to have.
I usually look at the blacks first. With 120 film it is quite easy to arrive at a good black point because the frame around the image is (or in my view should be) black. By holding down the Option key while moving the Blacks slider, the image becomes white. The darkest part of the image will gradually show up, either as black or sometimes as yellow or red. This means that those parts of the image are pure black. One can choose to pull further to crush the blacks. It all depends on the look one wants.
The next stop is usually Exposure. Holding the Option key works here as well, but the focus is on the highlights. This helps arriving at a suitable 'brightness' of the image. Because there are two other tools that deal with the highlights - the Whites and the Highlights sliders - I often increase pull the exposure slider just a little bit more than I would for the blacks. Film, and especially colour negative film, is extremely forgiving and contains an enormous amount of information in the highlights, which can easily be tweaked and recovered using these other two sliders.
Then I often play with the Shadows slider to arrive at a good balance between shadow areas and highlight areas. As with all of the above actions, this is based on how I want the image to look and my own (usually quite poor) recollection of the scene when I took the photo.
I am always in two minds about the Contrast slider. It is extremely powerful and can quite quickly cause unnatural-looking results. It is designed to affect, on the one hand, the 'middle-to-dark' areas, and, on the other hand, the 'middle-to-light' areas. The former become darker, and the latter become lighter. The problem is that this risks creating too 'steep' a curve from the midtones to each end of the histogram.
Normally I will only use one other panel in Adobe Camera Raw, and that is the Details panel (which looks like a triangle). This panel houses the sharpening and the noise reduction tools. I normally use these two tools in combination with the Clarity slider on the Basic panel. To my eyes, the Clarity slider gives a similar result to Photoshop's Unsharp Mask tool when the latter is set to a very low Amount (like 10-12) and a very high Radius (beyond the half-way point on the slider). This affects the edges of features in the image more than the overall sharpness of the image. A puff on the Clarity and Sharpness sliders can make an image 'pop' a little bit more without looking unnaturally contrasty. The Noise reduction's Color slider deals very well with scanner noise in shadow areas but desaturating it. I usually do not touch the other noise reduction sliders.
For black and white photos, I start with the Blacks slider, as described earlier. Then I usually try the Whites slider to lift the upper half of the tones. I usually prefer this to the Exposure slider which is much more intrusive since it affects the image from the darkest tones to the highlights. Then again it depends on the image in question. After the Whites slider, I normally adjust the Shadows slider depending on how inky I want the shadow areas. The next step is either one or both of the Contrast and Clarity sliders, again based on preference. The Clarity slider, while great for creating a bit of 'depth in an image by affecting edges, seems to black out things like eyes which can cause an unnatural look. As always, trial and error is in order. Finally, I sharpen the image under the Details panel.
And Photoshop again
The above describes my standard workflow. Depending on what I want to do with an image, for instance print it, I will go back to Photoshop and make further adjustments. Normally my editing will include some time in the Lab colour space (and I highly recommend Dan Margulis's book on this), some further shaperning, dodging and burning and the like.