
Project Film Dryer – Prototype
Published on 8 June 2019

Introduction
For years my home-developed black and white film has been plagued by drying marks and dust which has caused me much time in post-processing my film scans. The worst has been that I have not been able to identify one particular aspect of my film developing regime as the culprit. Sometimes films would come out virtually dust- and drying marks-free, whereas other times they would be so badly affected that there was little use in processing the scans for fear of losing enormous amounts of time per frame. I know that there are a few tricks to prevent drying marks and avoid dust getting stuck on the film. For instance, the vapour from a hot shower, run just before hanging the film in the shower to dry, will supposedly make dust particles fall to the ground. Hanging the film diagonally will make water run faster off the film, thus reducing the risk of drying marks. Some even suggest wiping the wet film with lint-free wipes.
In the good old film days there were film dryers to buy, like the Senrac dryer, and film cabinets with air filtration in which to hang films. These days, however, they are not easy to find and usually expensive if found. I have seen some very inspiring DIY film cabinets online but I don’t have space for that and have therefore thought of various designs for a film dryer of my own. A key premise for this prototype was that it would be tall enough to dry up to five 35mm spirals (since I have a five-spiral developing tank).
Here I present a prototype that can be built very easily with tools that most people have at home, which will cost around 50 Euro (and quite a bit less if you have some of the materials at home, especially the steel nails, duct tape and balloon holder (or equivalent)) and take an hour or so to make. It also works. Really well.
Materials and tools
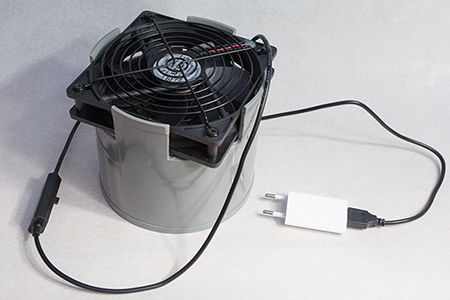
The materials I used are the following:
Eluteng 120 mm USB fan with speed control, 15 Euro
USB power plug, free if you have a USB-powered phone, otherwise around 3 Euro
1m PVC pipe 125 mm, 8 Euro
PVC pipe connector, 3 Euro
Air vent 125 mm, 3 Euro
Thin steel nails 2-3 cm long, 2 Euro for a pack
Balloon holder (or equivalent), 6 Euro for a pack of 100
Duct tape, 13 Euro
The tools needed are:
A saw
Pocket knife
Magic marker
A needle
Sandpaper, not too coarse
Step 1 - Cut the PVC pipe
The reason I picked a 125 mm PVC pipe was the size of the fan. Eluteng also has a similarly-priced 80 mm fan but I opted for the larger model because it moves more air which I imagine is good for a film dryer. I was only able to find a one-metre PVC pipe so the first step was to cut it to a suitable length. In my case, approximately 40 cm. I used a metal saw but I suspect any saw will work.
Step 2 - Cut the pipe connector into a ‘crown’

This is probably the trickiest part, to cut out four sections of the PVC pipe connector.
I placed the fan on top of the pipe connector and made small cuts with the saw along the fan’s sides. Then I sawed as deep as the fan is tall, which is approximately 3 cm.
To cut out the sections I flipped the pipe connector horizontally and sawed across until I could break off the sections.
At this point the four walls had sharp sides due to how the saw cut through the pipe. They can be left this way as the fan will fit anyway, but I sawed each vertical edge to make it look nicer. Lastly, use sandpaper to soften all edges.
Step 3 - Fit the fan
The fan will be held fairly tightly in place by the crown since PVC is quite rigid, but as you can see in the photo at the top of the page, I used duct tape around the fan.
This was to block the openings around the crown to focus the airflow and to make sure the fan stays put (note that in the photo at the left the fan is placed in the wrong direction).
Step 4 - Attaching the air vent

At the left you can see more clearly the type of air vent I used.
Ideally I would have wanted a vent that was designed to be attached to a 125 mm pipe, preferably glued.
This particular air vent is good, though, because it provides stability by acting as a foot when the film dryer is not used.
In this image and the image at the top of the page the air is only attached in two places.
However, I have since put duct tape around the whole pipe because the air vent need not be removable.
Step 5 - The balloon stick film holder

First I made four marks with a magic marker along the balloon stick where I would make holes for the nails on which the spirals will rest (as you can see on the image below, the lowest film spiral rests on the balloon stick’s “foot”, where a balloon would ordinarily be attached).
I then wrapped a piece of duct tape around the stick at each location to reinforce the stick.
I could not wrap the tape more than once around the stick because the centre hole in my film spirals is just a little bit wider than the balloon stick.
To make the holes I first used a needle.
I then widened the holes gently using a very pointy knife before I pushed the nails through.

As you can see on the photo at the right, the nails are placed in such a way to leave 1,5cm between each film spiral.
The reason is to ensure that the air reaches the lower films easily.
In use
I have found that this design works well. It is not particularly difficult to place the film spirals on the stick and insert a nail above each spiral. Also, the pipe connector slides off very easily from the PVC pipe so it is a three-second operation to insert the pipe with the spirals into the tube. Because the stick is not entirely rigid the spirals will lean against the inside wall but I have not found that any ill effects are caused by that. The air flows freely anyway.
That said, the film holder is the part that needs most work in the next iteration of the film dryer. While the balloon stick is sturdy enough to hold five spirals with film, I would prefer a rigid stick which is attached in a slot in the air vent to keep the spirals completely vertical. In that updated design, the film holder stick would probably also be attached at the top so that the stick is perfectly centered in the tube.
I picked a fan with three speeds because I was not sure how fast the fan would need to spin or how noisy it would be. It turns out that the fan is virtually silent and that any speed can be used. I dried four rolls at the highest speed in approximately 20 minutes, though I think they were actually dry much earlier.
Just to point out the obvious: the film dryer cannot stand on its “foot” when in use so I just lean it against the wall which means that the air is blown away at an angle from the film dryer. In the next iteration I might include three legs so that the dryer can stand more easily on its own. Another option is to attach the film dryer to a wall using a pipe bracket.
My initial design included an air filter. I tried two kinds, a circular HEPA filter meant for a Dyson machine of some sort and an air filter cloth designed to remove 50% of ePM10, that is, particles up to 10µm in size which includes fine dust, pollen and the like. However, I was not able to ensure sufficient air flow using the fan I had bought so I decided to skip the filter.